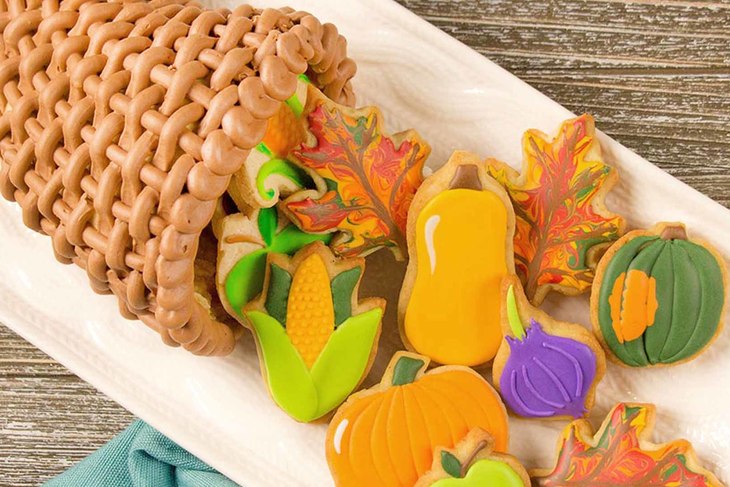
Thanksgiving Cornucopia Cookie
These Thanksgiving cookies from SweetAmbs are perfect for the Thanksgiving holiday! These would be a great addition to any seasonal dessert table. Amber breaks down the steps to make these cookies in the instructions below, and all the supplies you’ll need are right here.
Ingredients
- Greased tin foil form (approximately 5.5” long, 3.75” wide, 2.5” high)
- [Sugar cookie dough
- http://goboldwithbutter.com/love-bug-sugar-cookies/]
- Templates
- Knife to cut the cookies
- Stiff peak royal icing in brown
- 15-second count royal icing in orange, yellow, purple, white, dark green, light green, red, brown (test the consistency by taking a spoonful of icing out of the bowl and dropping it back in. It should take about 15 seconds for the icing to be completely smooth)
- 12” decorating bags
- Couplers
- Decorating tip numbers 1 and 8
- Scriber needle or toothpick
- Decorator brush
Instructions
Step 1
To make the cornucopia, drape a piece of cookie dough over the greased tin foil form. Shape and trim the dough to fit.Step 2
Bake the form about 6 minutes and check to make sure the dough is keeping its shape. If not, carefully shape the dough around the dorm using an oven mitt or towel to protect your hands. Bake another 6 minutes or until the edges are light golden brown (if it’s not perfect, don’t worry! The whole thing will be covered with icing).Step 3
Allow the cookie to cool before removing the form. If the form doesn’t easily come out all at once, you can take it out by tearing pieces of the tin foil away from the cookie.Step 4
Cut the vegetable and leaf cookies using the templates from a chilled sheet of cookie dough and bake the cookies according to the instructions.Step 5
Ice the cornucopia with stiff peak brown royal icing and a decorating tip 8 using a basket weave pattern. Do do this, pipe one long vertical line and several short horizontal lines over it, leaving enough space for the tip to fit in between the lines. Use the decorator brush to flatten the edges of the short lines, then pipe another vertical line next to the first one making sure to cover the flattened edges of the short lines. Pipe the next column of short horizontal lines so that they fit in between the short lines in the previous column. Continue the pattern until the entire cookie is covered. Finish the edge with a swirl border.Step 6
Ice the vegetable cookies with 15-second count royal icing and a decorating tip 1, allowing each section to dry before piping the next. Use the scribe tool or toothpick to help shape the icing.Step 7
Ice the leaf cookie by applying a little bit of each color and using the scribe tool or toothpick to marble the colors and shape the edges. While the icing is still wet, pipe a vein using the brown icing and use the scribe tool to shape it.Step 8
Allow the icing to dry at least 8 hours before filling the cornucopia.

_1.png?ext=.png)
_1.png?ext=.png)

A Dairy Farmer’s Devotion to Feeding Others
Learn how a new farmer, just a decade into her career, approaches her day-to-day and commits herself to helping end hunger.Reviews & Tips
There are no reviews yet for this recipe. Be the first to write a review.
Write a Review