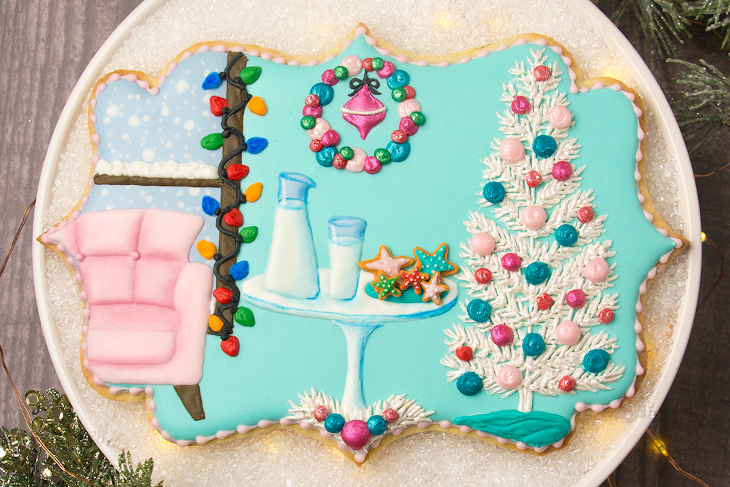
Cozy Christmas Scene Cookie
Prepare for an extra festive Christmas with this buttery design by SweetAmbs!
1 hr Prep Time
10 min Cook Time
- Prep Time: 1 hr
- Cook Time: 10 min
Ingredients
- 1 batch sugar cookies
- 1 batch royal icing
- Plaque cookie template
- Wax paper
- Food coloring
- 15-second count royal icing in white, light teal, light pink, and blue. (Test the consistency by taking a spoonful of icing out of the bowl and dropping it back in. It should take about 15 seconds for the icing to be completely smooth)
- Soft peak royal icing in white, pink, bright pink, red, teal, green, brown, golden brown, and black
- Stiff peak royal icing in white
- 12” decorating bags
- Decorating tip numbers 1 and 3
- Scriber needle or toothpick
- Edible luster dust for painting in white, teal, green, and bright pink
- Edible matte dust for painting in white and pink
- Orange and royal blue food coloring for painting
- Vodka or any flavor extract to mix with food coloring and dust to use as paint
- Decorator brushes
Instructions
Step 1
From a chilled sheet of cookie dough using the plaque cookie template as a guide, cut around the plaque with the paring knife. Bake and cool the cookie according to the recipe instructions.Step 2
Trace the window from the template onto the cookie with a scribe tool or toothpick.Step 3
Ice around the window with light teal 15-second count royal icing and a decorating tip 3. Use the scribe tool to help shape the icing.Step 4
Fill in the window with blue 15-second count royal icing. Use the scribe tool to help shape the icing.Step 5
Pipe snowflakes in the window with white 15-second count royal icing while the base layer of icing is still wet. Allow the icing to dry completely (overnight is best).Step 6
Use the scribe tool and the template to trace the couch, the table with milk and cookies, the hanging ornament and wreath, and the tree.Step 7
Ice the window trim and the leg of the couch with brown soft peak royal icing and a decorating tip 1. Use the scribe tool to help shape and smooth the icing.Step 8
Fill in the couch cushions with light pink 15-second count royal icing and a decorating tip 1, making sure to only ice the sections that are not directly next to each other. Use the scribe tool to help shape the icing. Allow them to dry for about 30 minutes before filling in the rest of the cushions.Step 9
Ice the base of the table with white 15-second count royal icing and a decorating tip 1. Use the scribe tool to help shape the icing.Step 10
Ice the hanging ornament with bright pink soft peak royal icing and a decorating tip 1.Step 11
Pipe the tree with white stiff peak icing and a decorating tip 1.Step 12
Continue to fill in the couch cushions with light pink icing, leaving the seat cushion empty for now.Step 13
Ice the tabletop with white 15-second count royal icing and a decorating tip 1. Use the scribe tool to help shape the icing.Step 14
Fill in the seat cushion on the couch with the light pink 15-second count icing.Step 15
Use the white stiff peak icing and a decorating tip 1 to pipe snow on the window.Step 16
Pipe the pitcher and glass of milk with white 15-second count icing and a decorating tip 1, leaving some room at the top. Use the scribe tool to help shape the icing. Fill in the top with blue 15-second count icing and a decorating tip 1.Step 17
Ice the plate with teal soft peak icing and a decorating tip 1. Use the scribe tool to help shape and smooth the icing.Step 18
Pipe the decoration at the bottom of the cookie with white stiff peak icing and a decorating tip 1.Step 19
Use the white stiff peak icing to fill in the branches on the tree.Step 20
Pipe a wire for the lights along the window trim and a string on the hanging ornament with black soft peak icing and a decorating tip 1.Step 21
Pipe the lights with white, green, and red soft peak icing and a tip 1.Step 22
Pipe a wreath of ornaments with light pink, teal, bright pink, red, and green soft peak icing and a tip 1. Use the same icing to pipe ornaments on the tree.Step 23
Use a dry brush to dust the edges of the couch cushions to add shading.Step 24
Paint the white lights with orange and royal blue food coloring mixed with vodka.Step 25
Paint shading and outlines on the pitcher and glass of milk with the royal blue food coloring mixture. Paint a reflection on the pitcher and glass with edible white dust mixed with vodka.Step 26
Add shading to the table with the royal blue food coloring mixture.Step 27
Paint the tree and the decoration at the bottom of the cookie with white edible luster dust mixed with vodka.Step 28
Paint the ornaments with white, teal, green, and bright pink edible luster dust mixed with vodka.Step 29
Place a piece of wax paper over the small star on the template and pipe the stars with golden brown soft peak icing and a tip 1. Slide the wax paper over to pipe more stars. These will be the sugar cookies on the plate. Allow the icing to dry for about 10 minutes.Step 30
Ice each star with soft peak icing and allow it to dry for another 10 minutes before adding “sprinkles” with tiny dots of white 15-second count icing. Allow the icing to dry for at least an hour before removing them from the wax paper.Step 31
Attach the stars to the plate with a little bit of soft peak icing on the back of each one. Use the scribe tool to help push them into place.Step 32
Pipe a border around the edge with light pink soft peak royal icing and a decorating tip 1. Let dry and enjoy your work of cookie art!A Dairy Farmer’s Devotion to Feeding Others
Learn how a new farmer, just a decade into her career, approaches her day-to-day and commits herself to helping end hunger.Reviews & Tips
There are no reviews yet for this recipe. Be the first to write a review.
Write a Review
